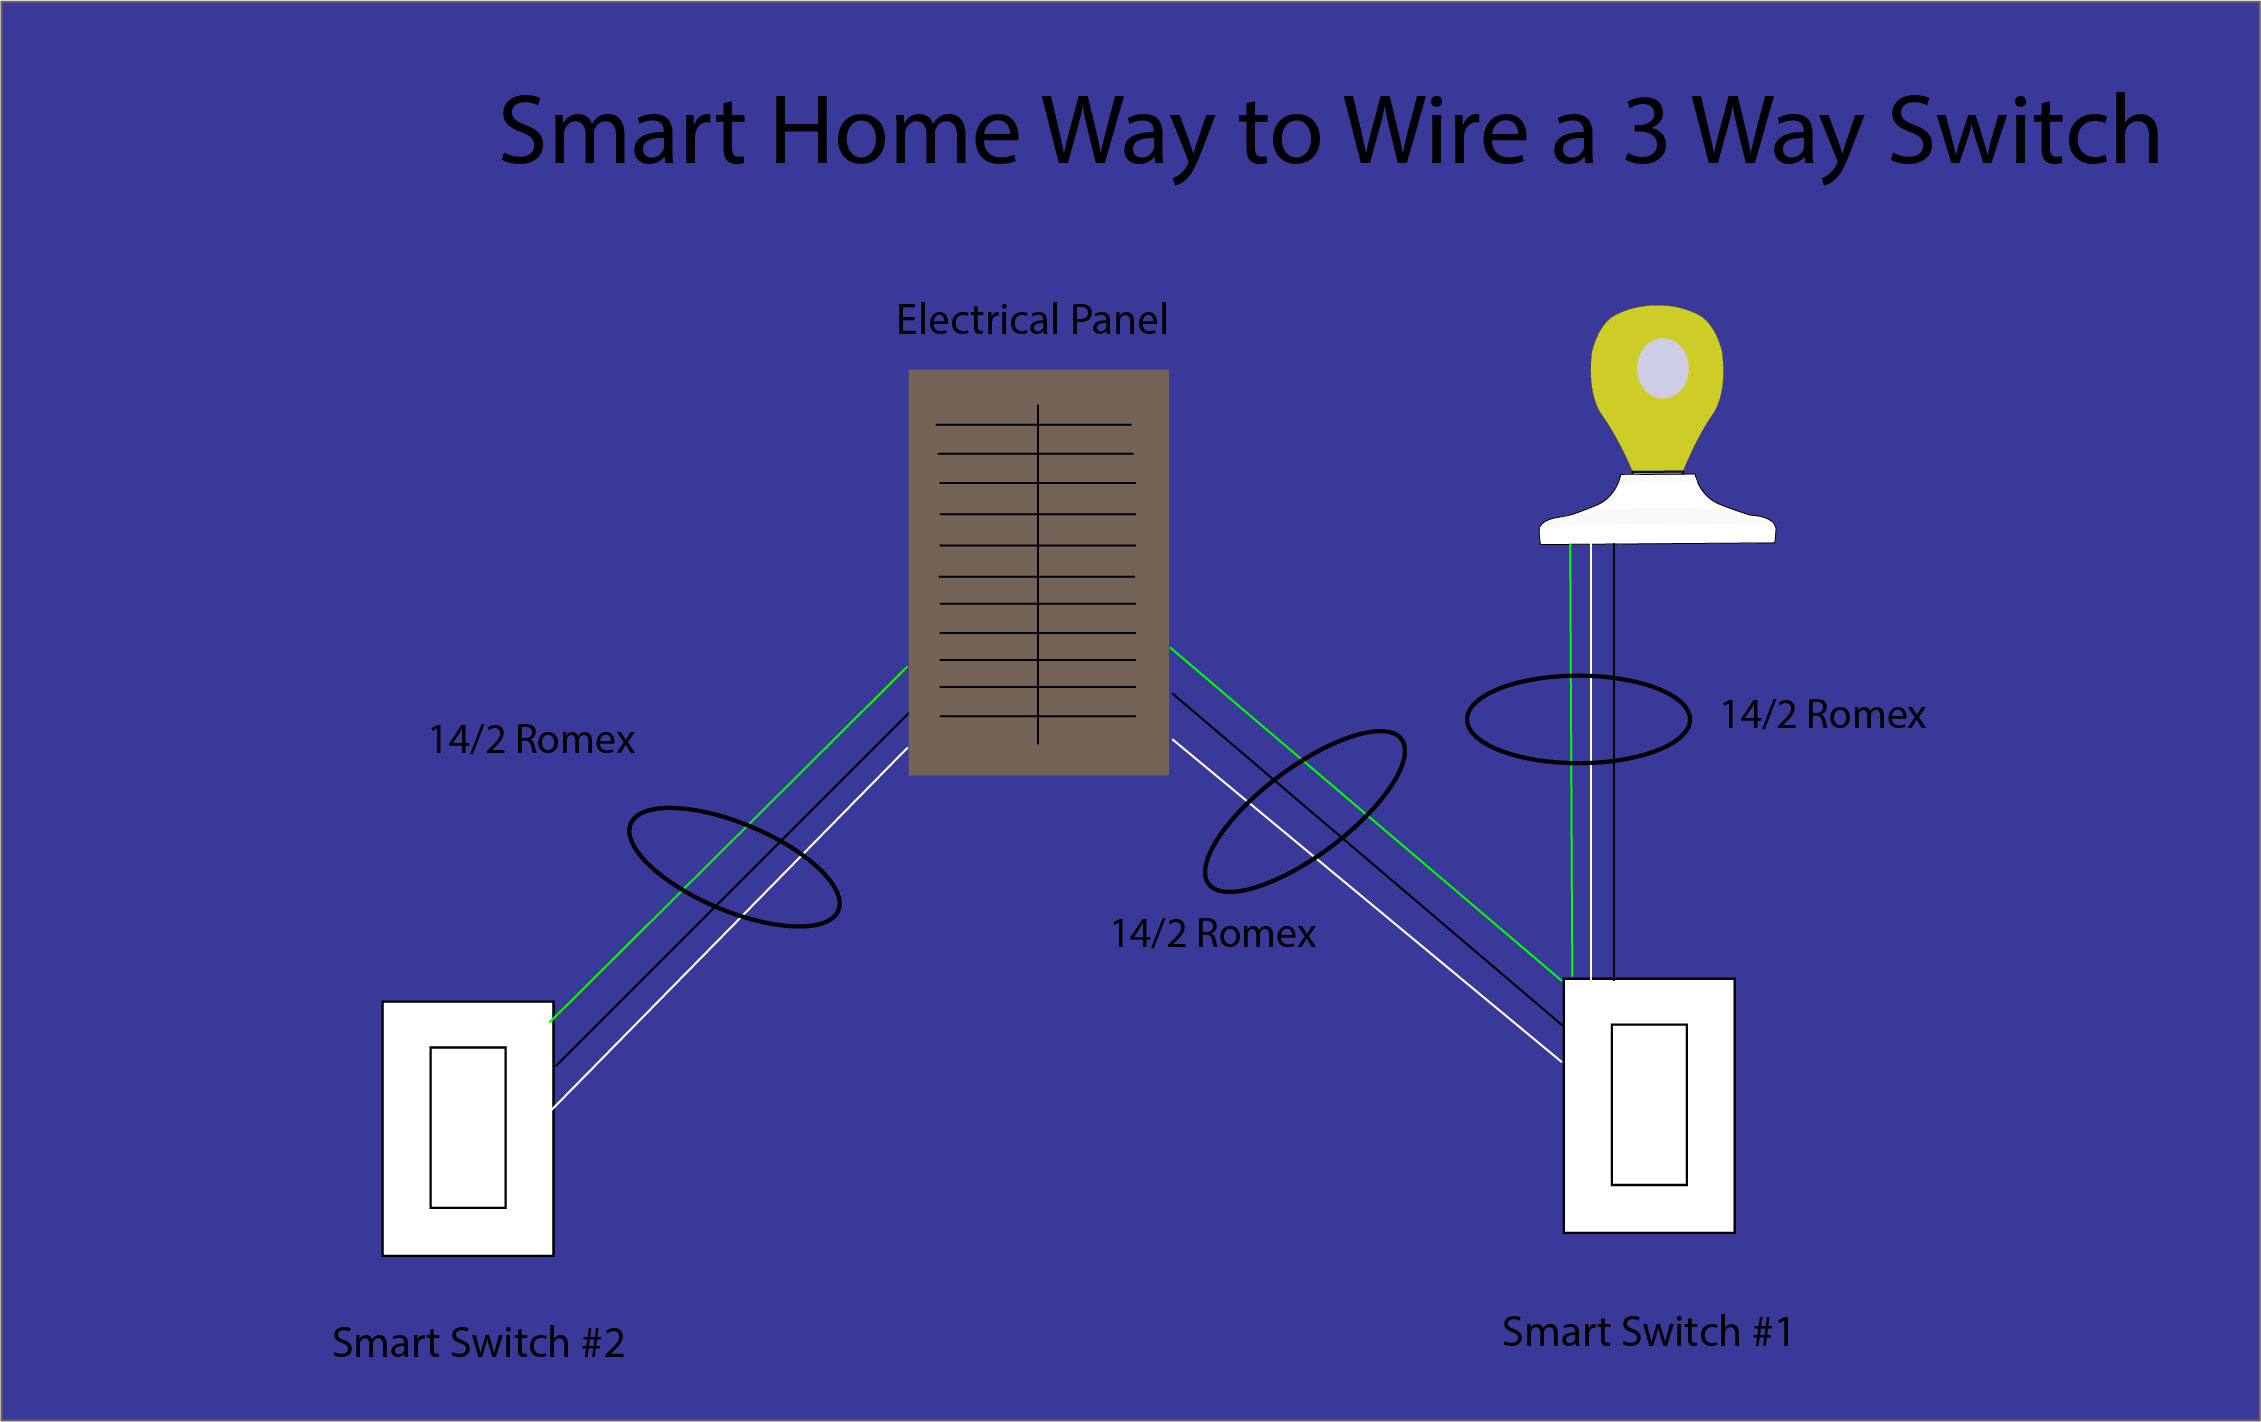
Learn how to wire a three way switch, the easy way. There are several different ways to wire a 3 way switch. I will show you how to do it the traditional way, and how you can do it much easier, with a smart switch.
More...
How to wire a 3 way switch-
The traditional way
The wire
First let’s talk about the different types of wire you are likely to use when wiring a three way switch for lighting. In most circumstances, for residential lighting, you will be using 14 AWG Romex wire. AWG stands for American Wire Gauge, and describes how much current the wire can carry. The lower the AWG, the more current the wire can carry. A 14 AWG is good for 15 Amps, which is good enough for most lighting applications.
- MATH: Add the wattage of each light together, and then divide it by 120. This will give you the approximate number of Amps. Keep it at 12 Amps or less when using 14 AWG wire and standard 15A three way switches, to be safe.
You will need two different types of 14 AWG wire, to wire your three way switch. You will need 14/2 Romex, and 14/3 Romex. 14/2 wire has two power carrying conductors, a black, and a white, plus a bare ground wire. Similarly, 14/3 has a black, a white, and a bare ground wire, but includes an additional red conductor, hence the 3 in the name instead of the 2.
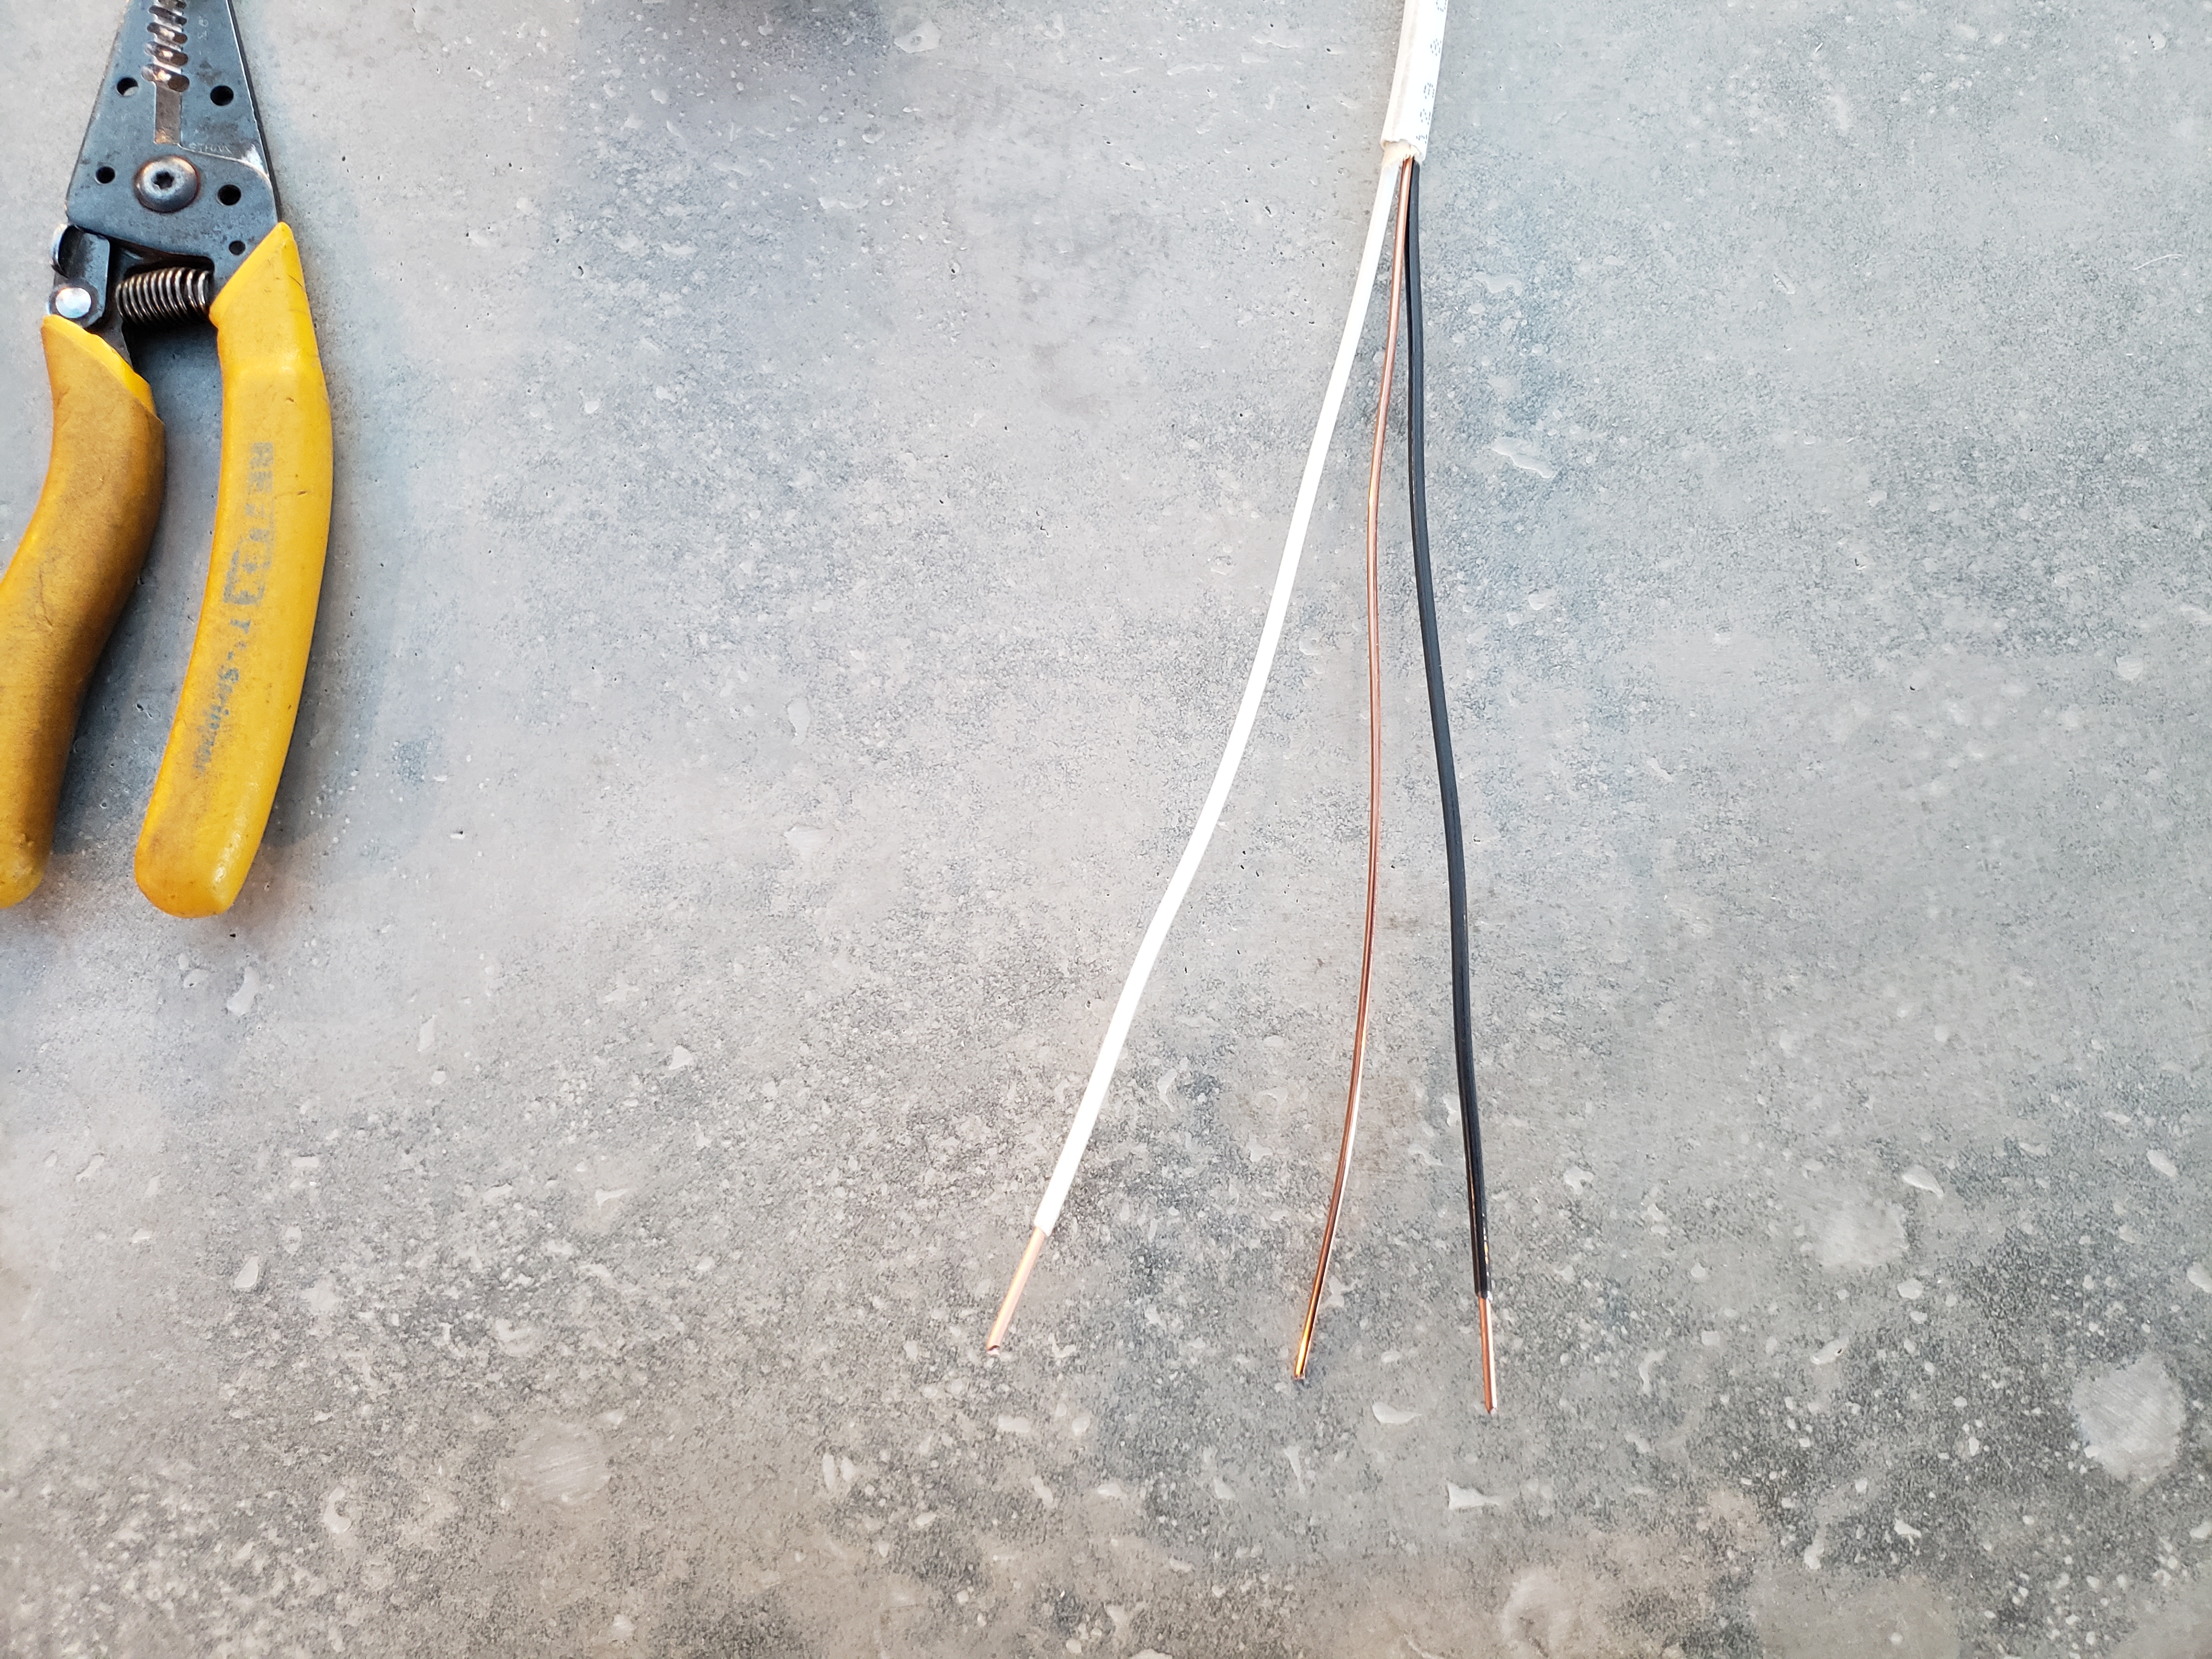
14/2 Wire
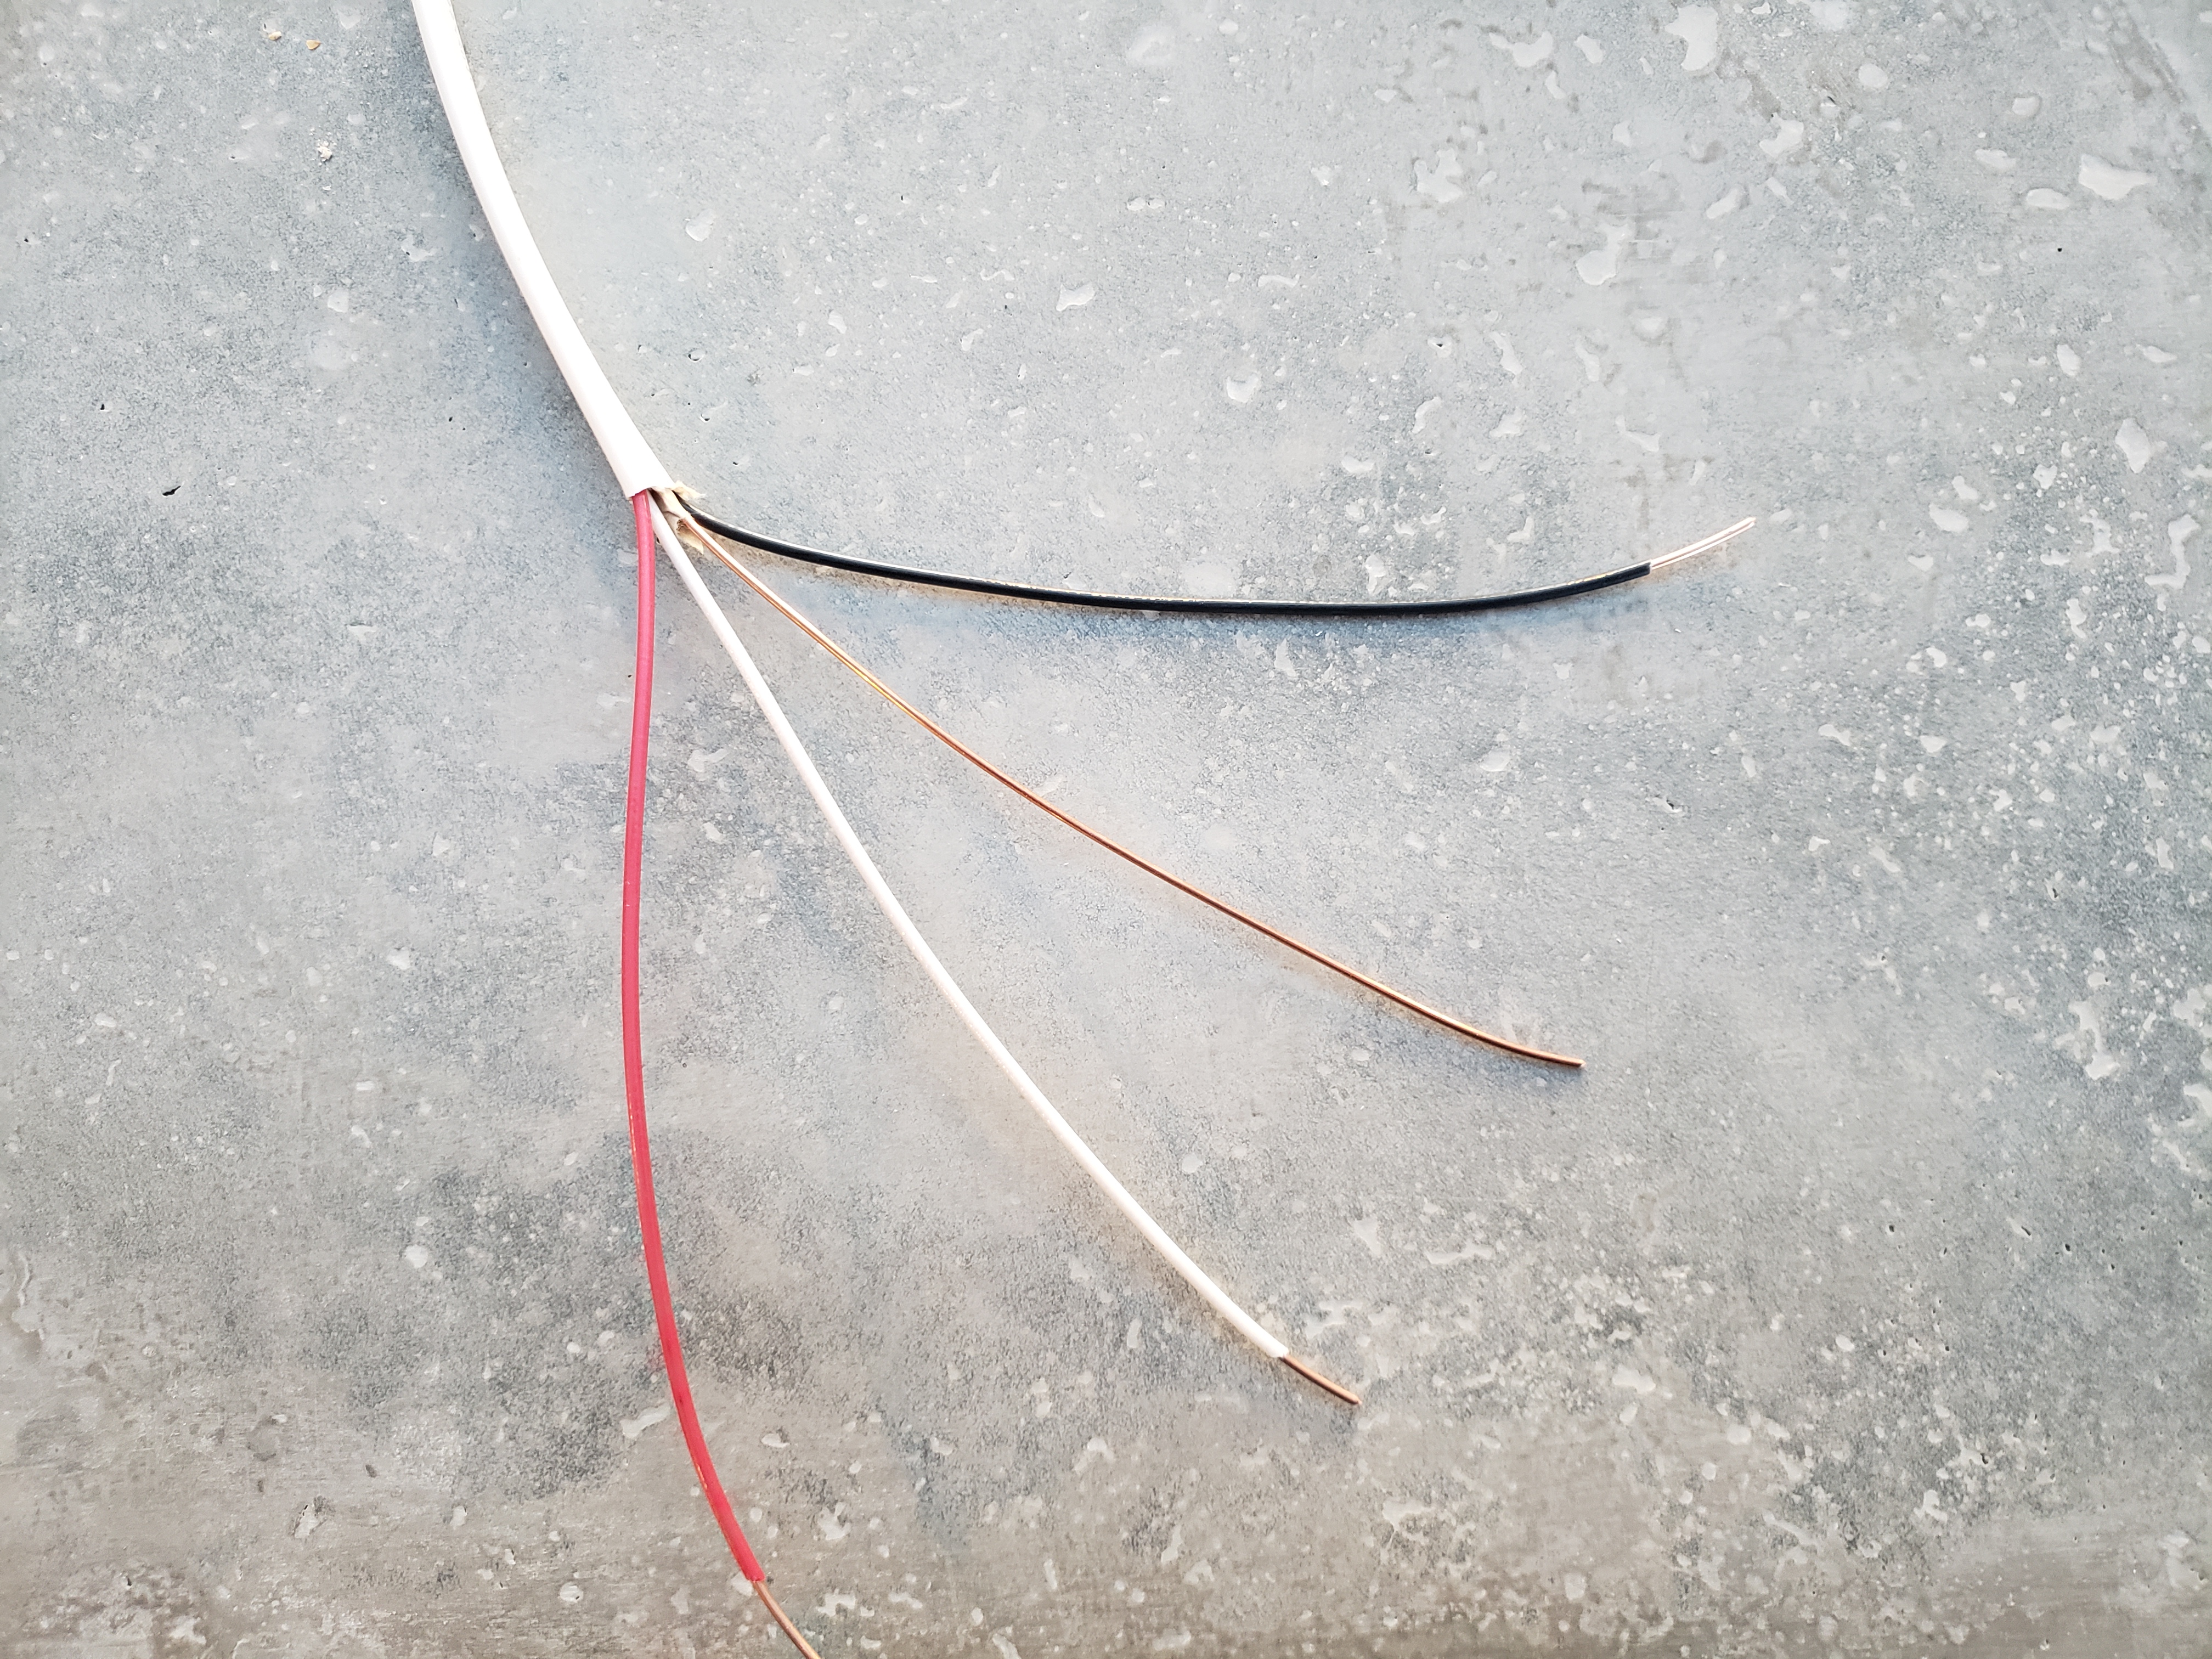
14/3 Wire
The switches
A three way switch will have four screws on it. It will have a screw for the ground wire. This will be the screw attached directly to the case of the switch. It may, or may not be green. Then there should be a black screw. This is the common screw. Then there should be two screws that are usually silver, or gold, on opposite sides from one another. These are called the travelers. These are the screws that you will be attaching the black, and red wires from the 14/3 to. A three way switch will not have any "on", and "off" labels on it.
In contrast, a single pole switch, one that is used to turn a light on and off from one location, will only have three screws. It will have the ground screw, attached directly to the case, and it will have two silver, or gold screws on the same side. A single pole toggle switch should also have "on" and "off" labels on the toggle.
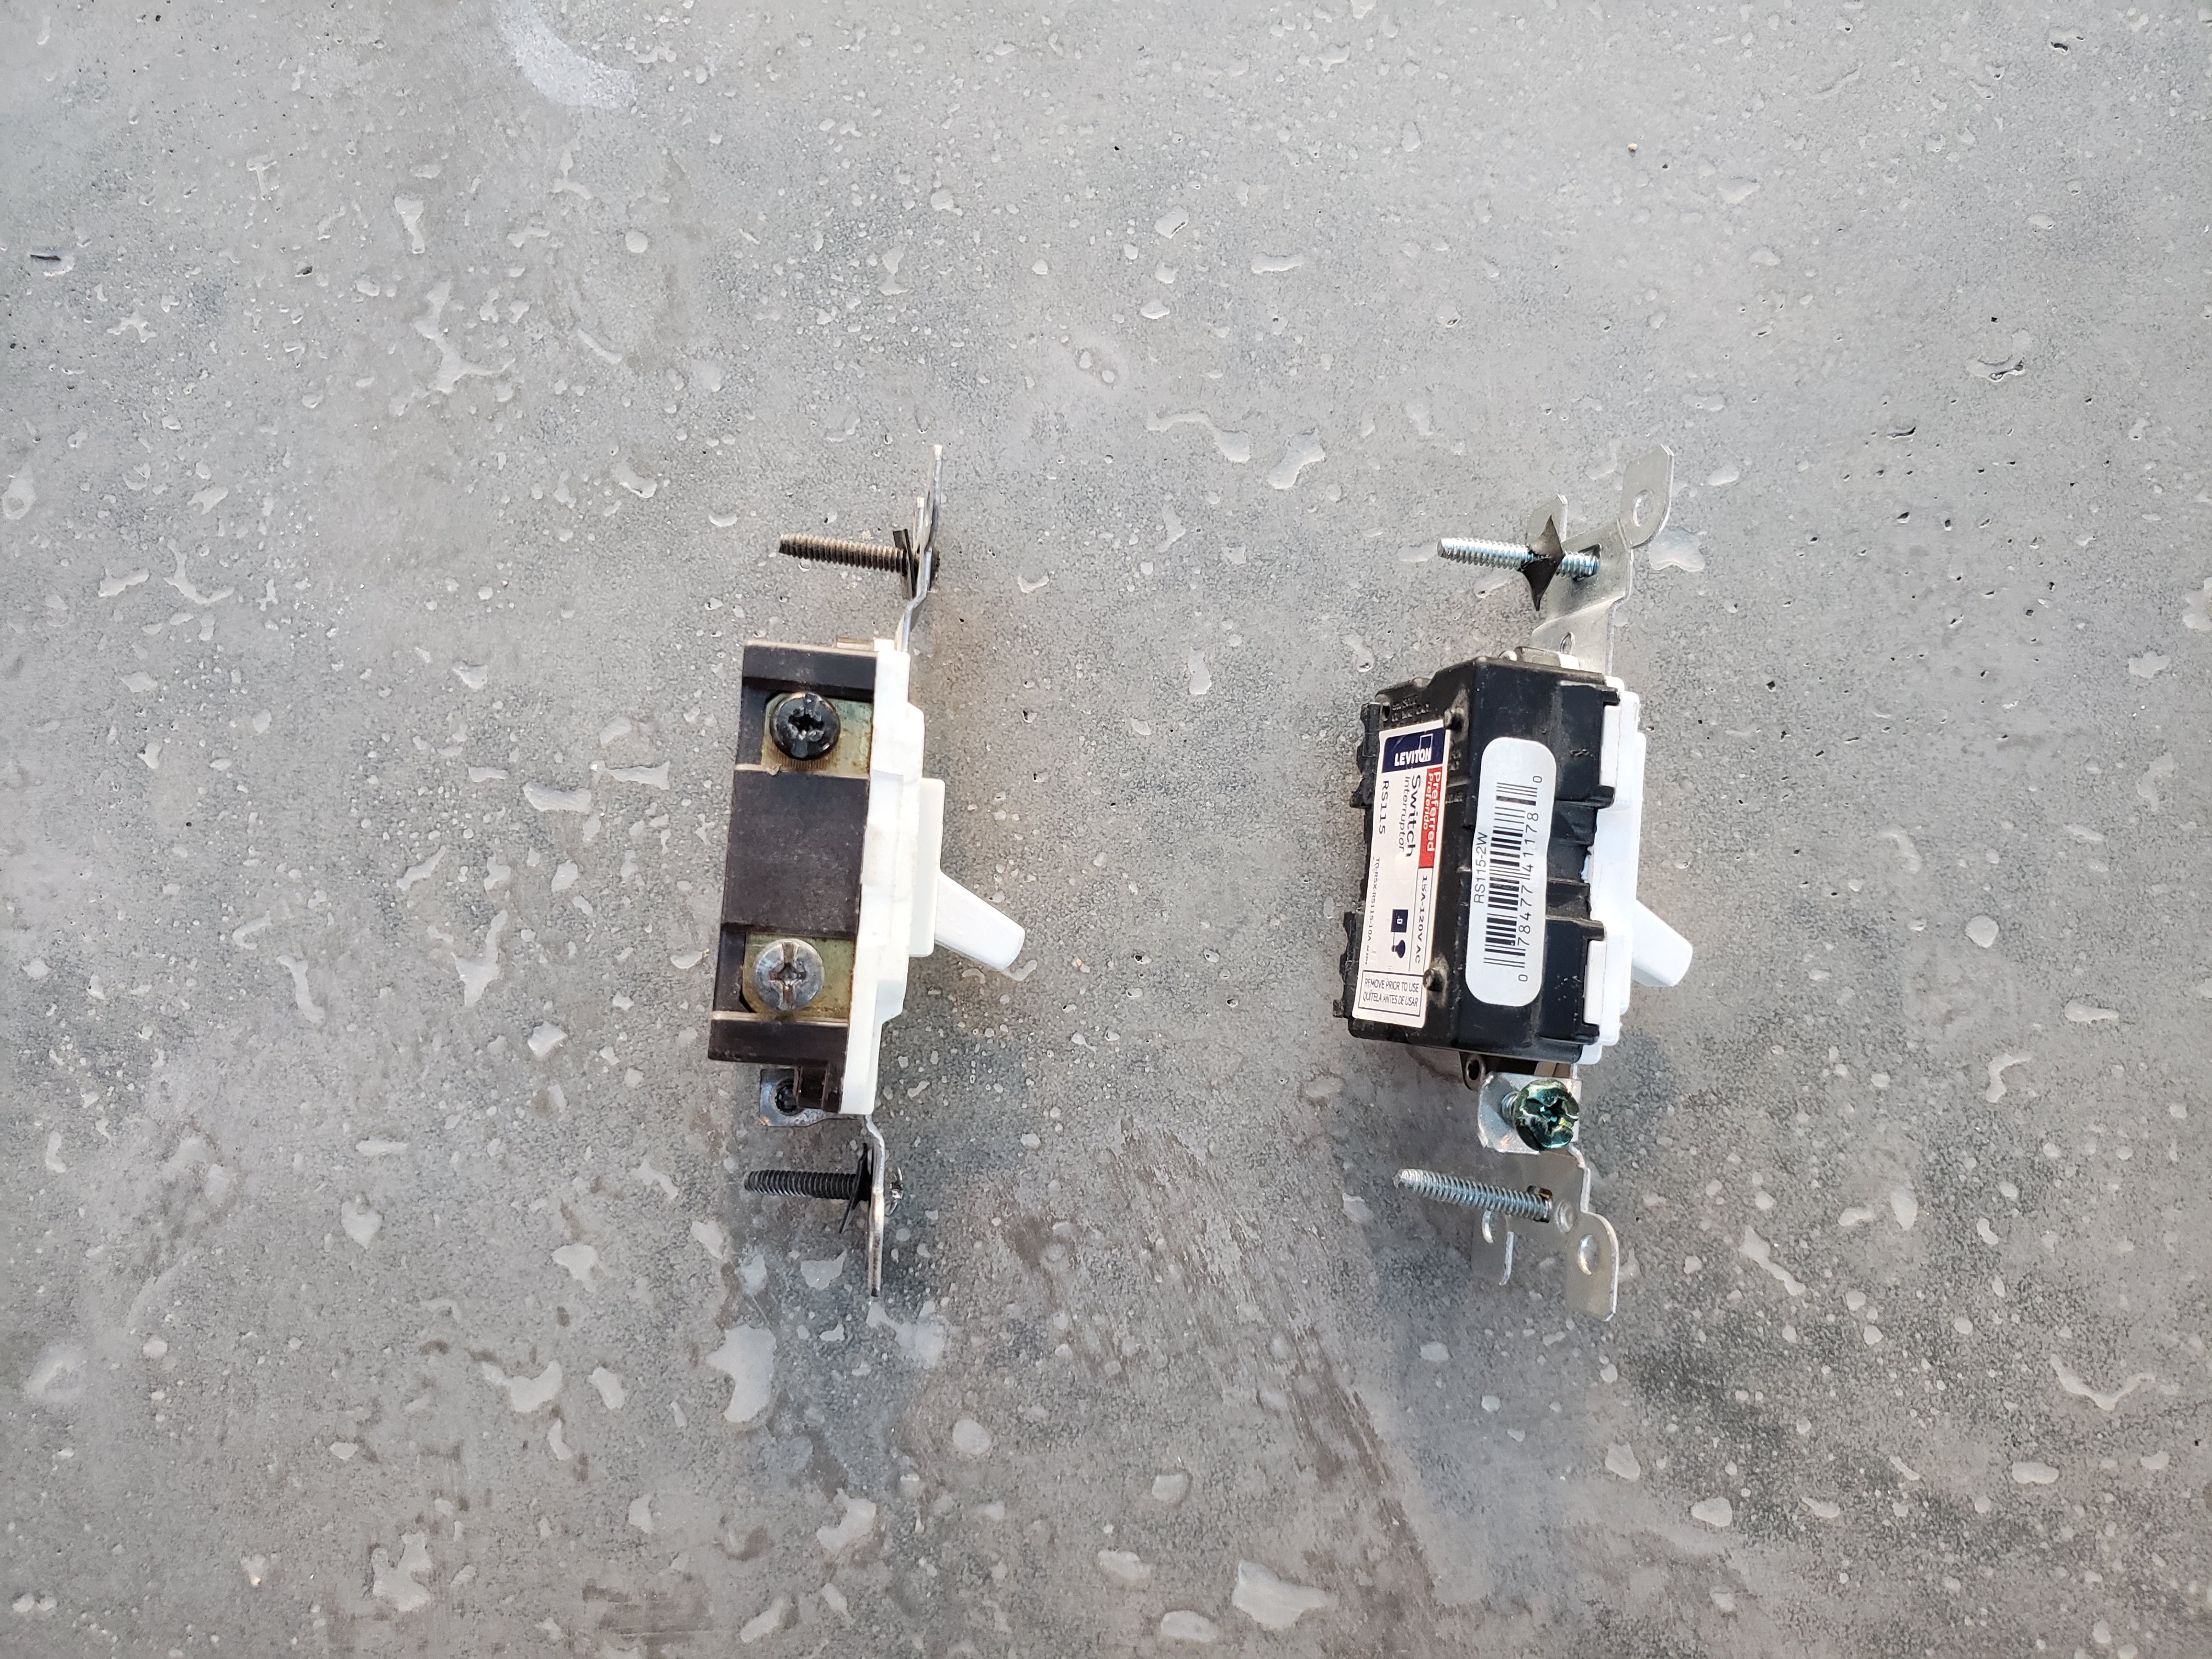
3 way switch on the left, and single pole switch on the right. Notice the black common screw at the top of the 3 way switch.
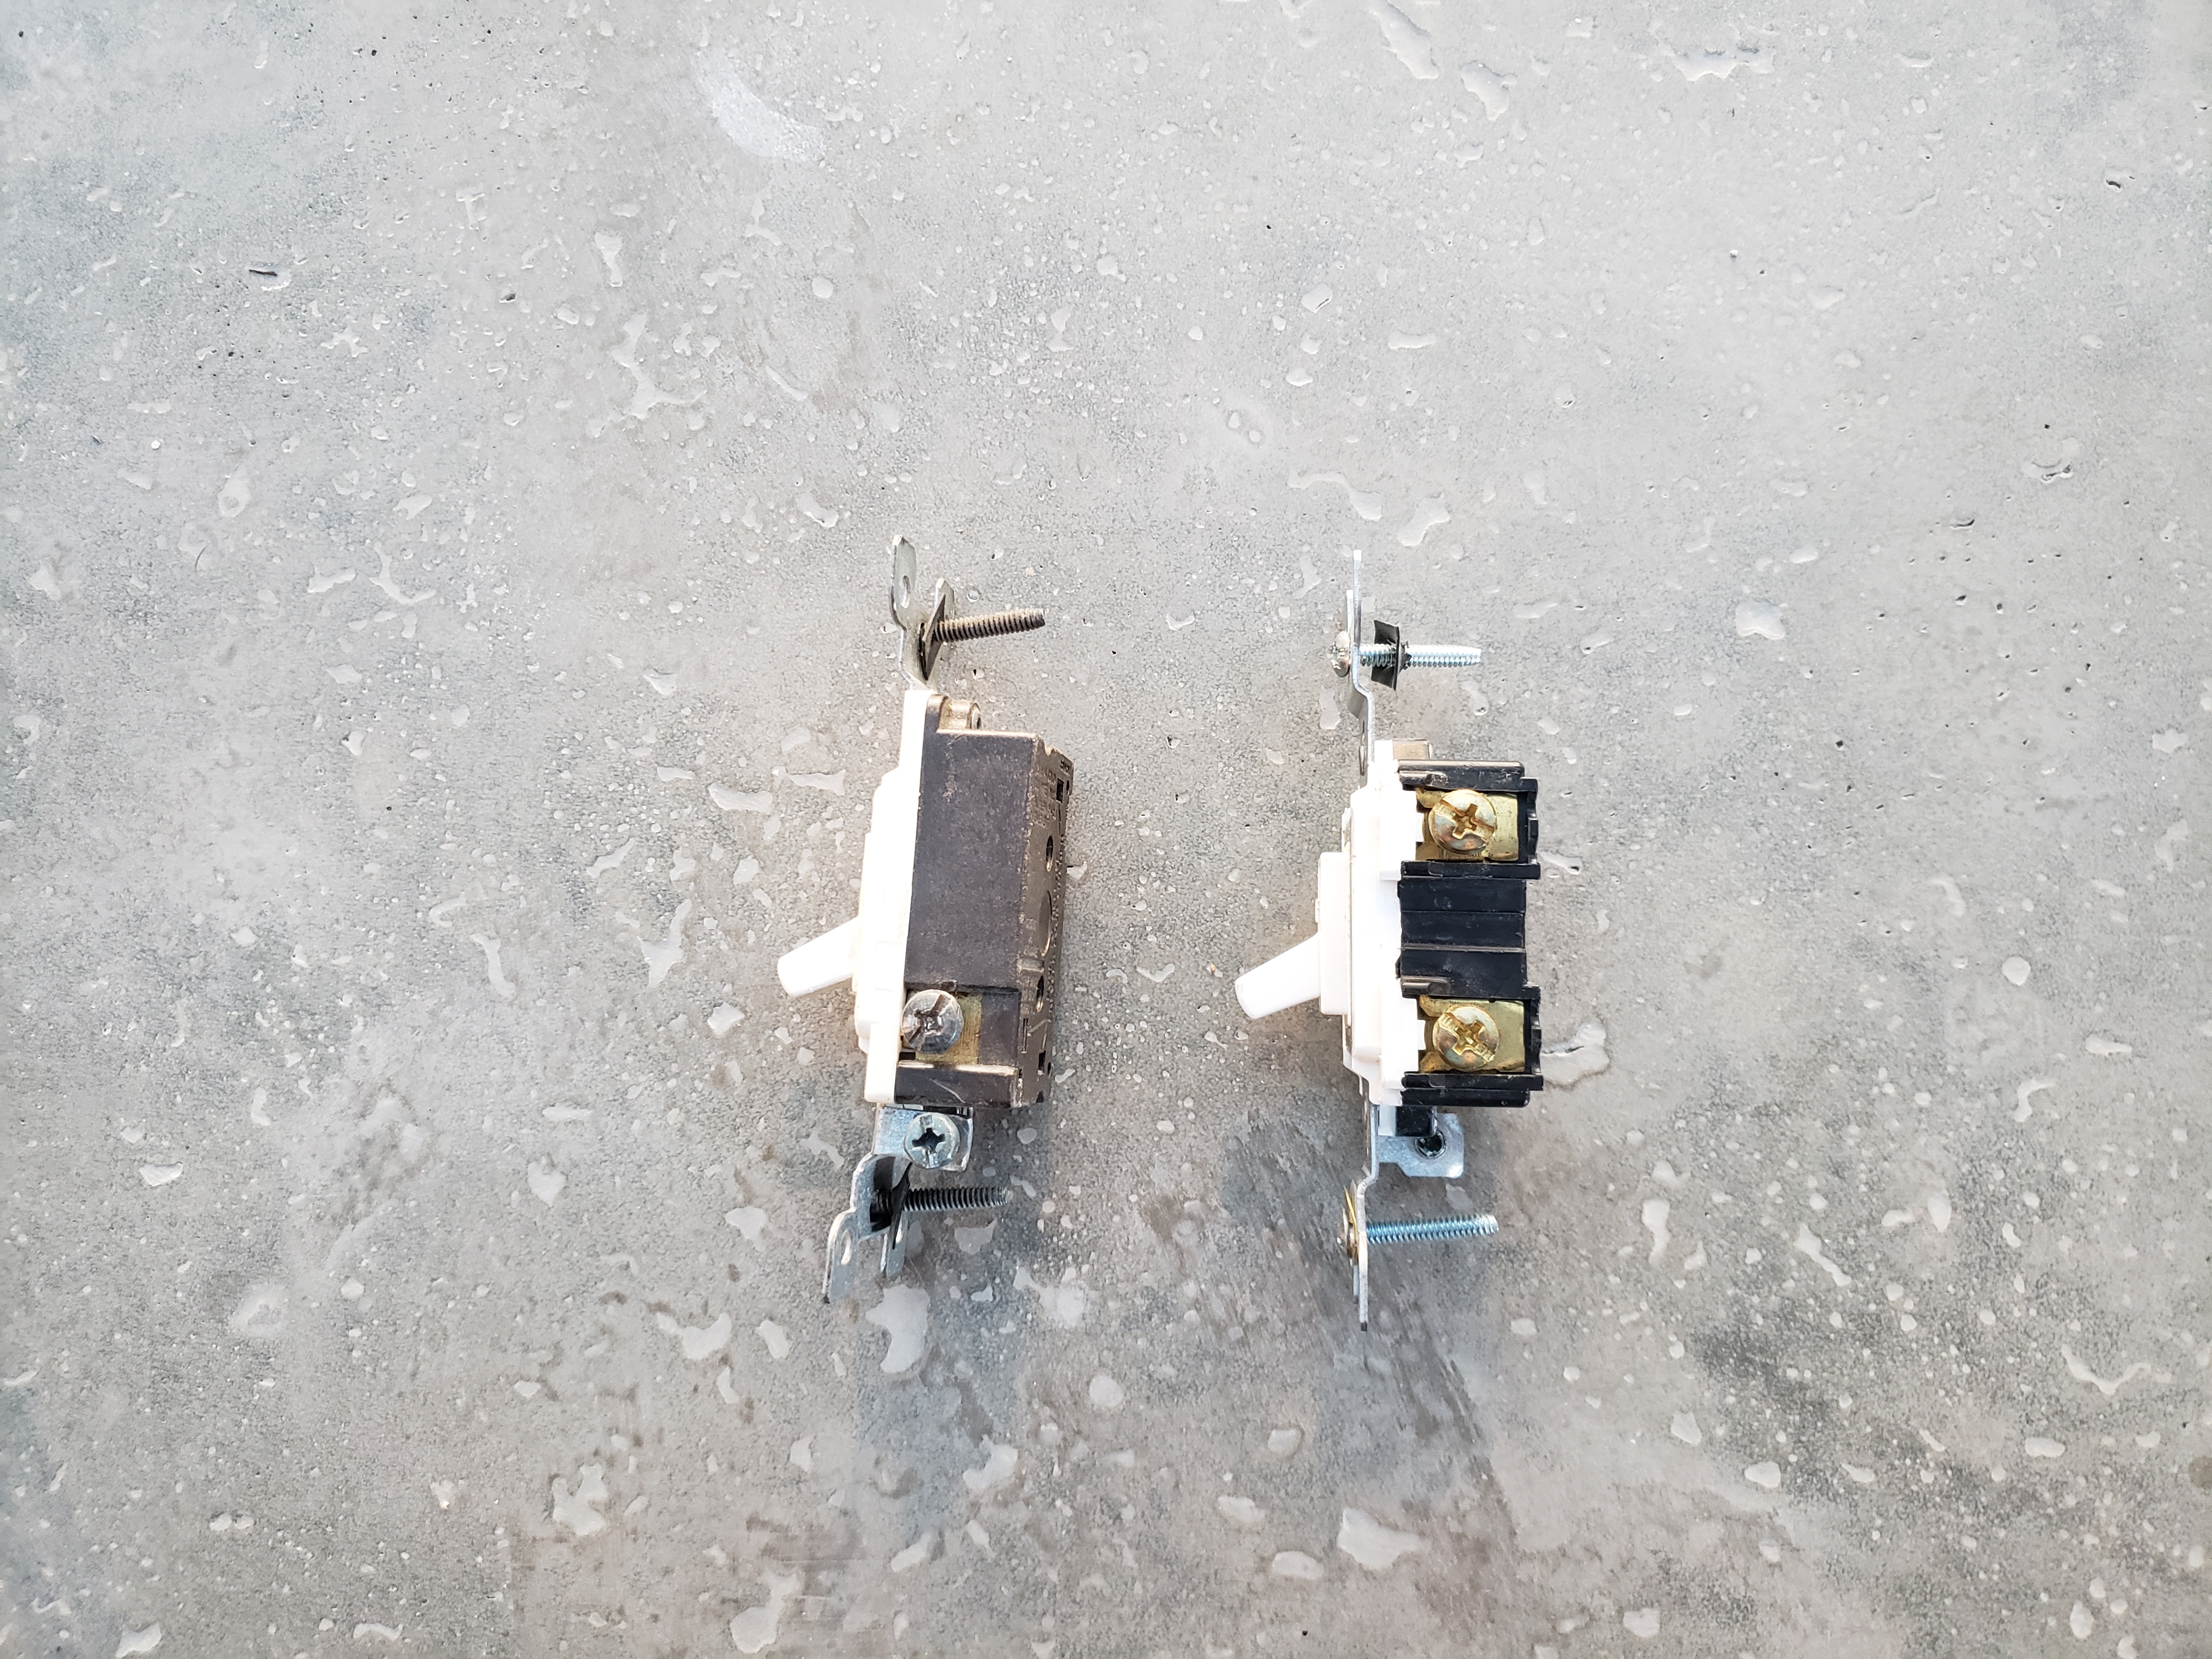
3 way switch on the left, and single pole switch on the right. Notice the single pole only has the two screws, plus ground.
Wiring a 3 way switch- The traditional way
There are different ways you can wire a 3 way switch, depending on which boxes the feed wire (wire coming from the panel), and load wire (wire going to the light) are located in. I have found it easiest to have the feed wire go into one of the light switch boxes, and the load wire go into the other light switch box, so that is the method I’m going to be showing you.
The only time I would recommend wiring a three way switch the traditional way is if it meets one of the following criteria:
- 1If it is new construction, and you aren't interested in dimming.
- 2Or if it is a renovation, and you have clear access to run wires, and you aren't interested in dimming. NOTE: some specialty three-way switches can be dimmed from both locations, like these Lutron Maestro Dimmers
- 3You are on a tight budget, you are comfortable snaking wires through the walls, and you aren't interested in dimming.
It is far more difficult to wire a three way switch the traditional way, if you don't have clear access into the walls to run the wires. If you don't have access to easily run wires, or if you have interest in dimming the lights from both switch locations, I recommend that you move onto the smart switch way below. Otherwise, I will assume that you are able to easily run the wires, so we will continue on to the wiring.
Pulling the wires
- 1First of all you need to get power from your electrical panel into one of the switch boxes using 14/2 wire. This can be either directly from the panel itself, or you can run a sub feed off from another lighting circuit somewhere in your house. You need to make sure you aren't mixing wire gauges, and that you aren't overloading a particular circuit. You also need to make sure are running pulling the wires through the wall properly to ensure they don't get damaged. This article doesn't get into the details on how to run the wires, and the dos and the don'ts. If you are not familiar with how to run the wires properly, I recommend that you contact a professional, or try the smart switch way below.
- 2Secondly, you need to get a 14/2 wire from the light, to the other switch box.
- 3Finally, you need to run a 14/3 wire between the two switch boxes.
Wiring the switches
Now you should have a 14/2, and a 14/3 wire in each switch box. In switch box #1, you should have a 14/2 feed wire, and a 14/3 wire going to the other switch box. In box #2 you should have a 14/2 wire going to the light, and a 14/3 wire going to the other switch box.
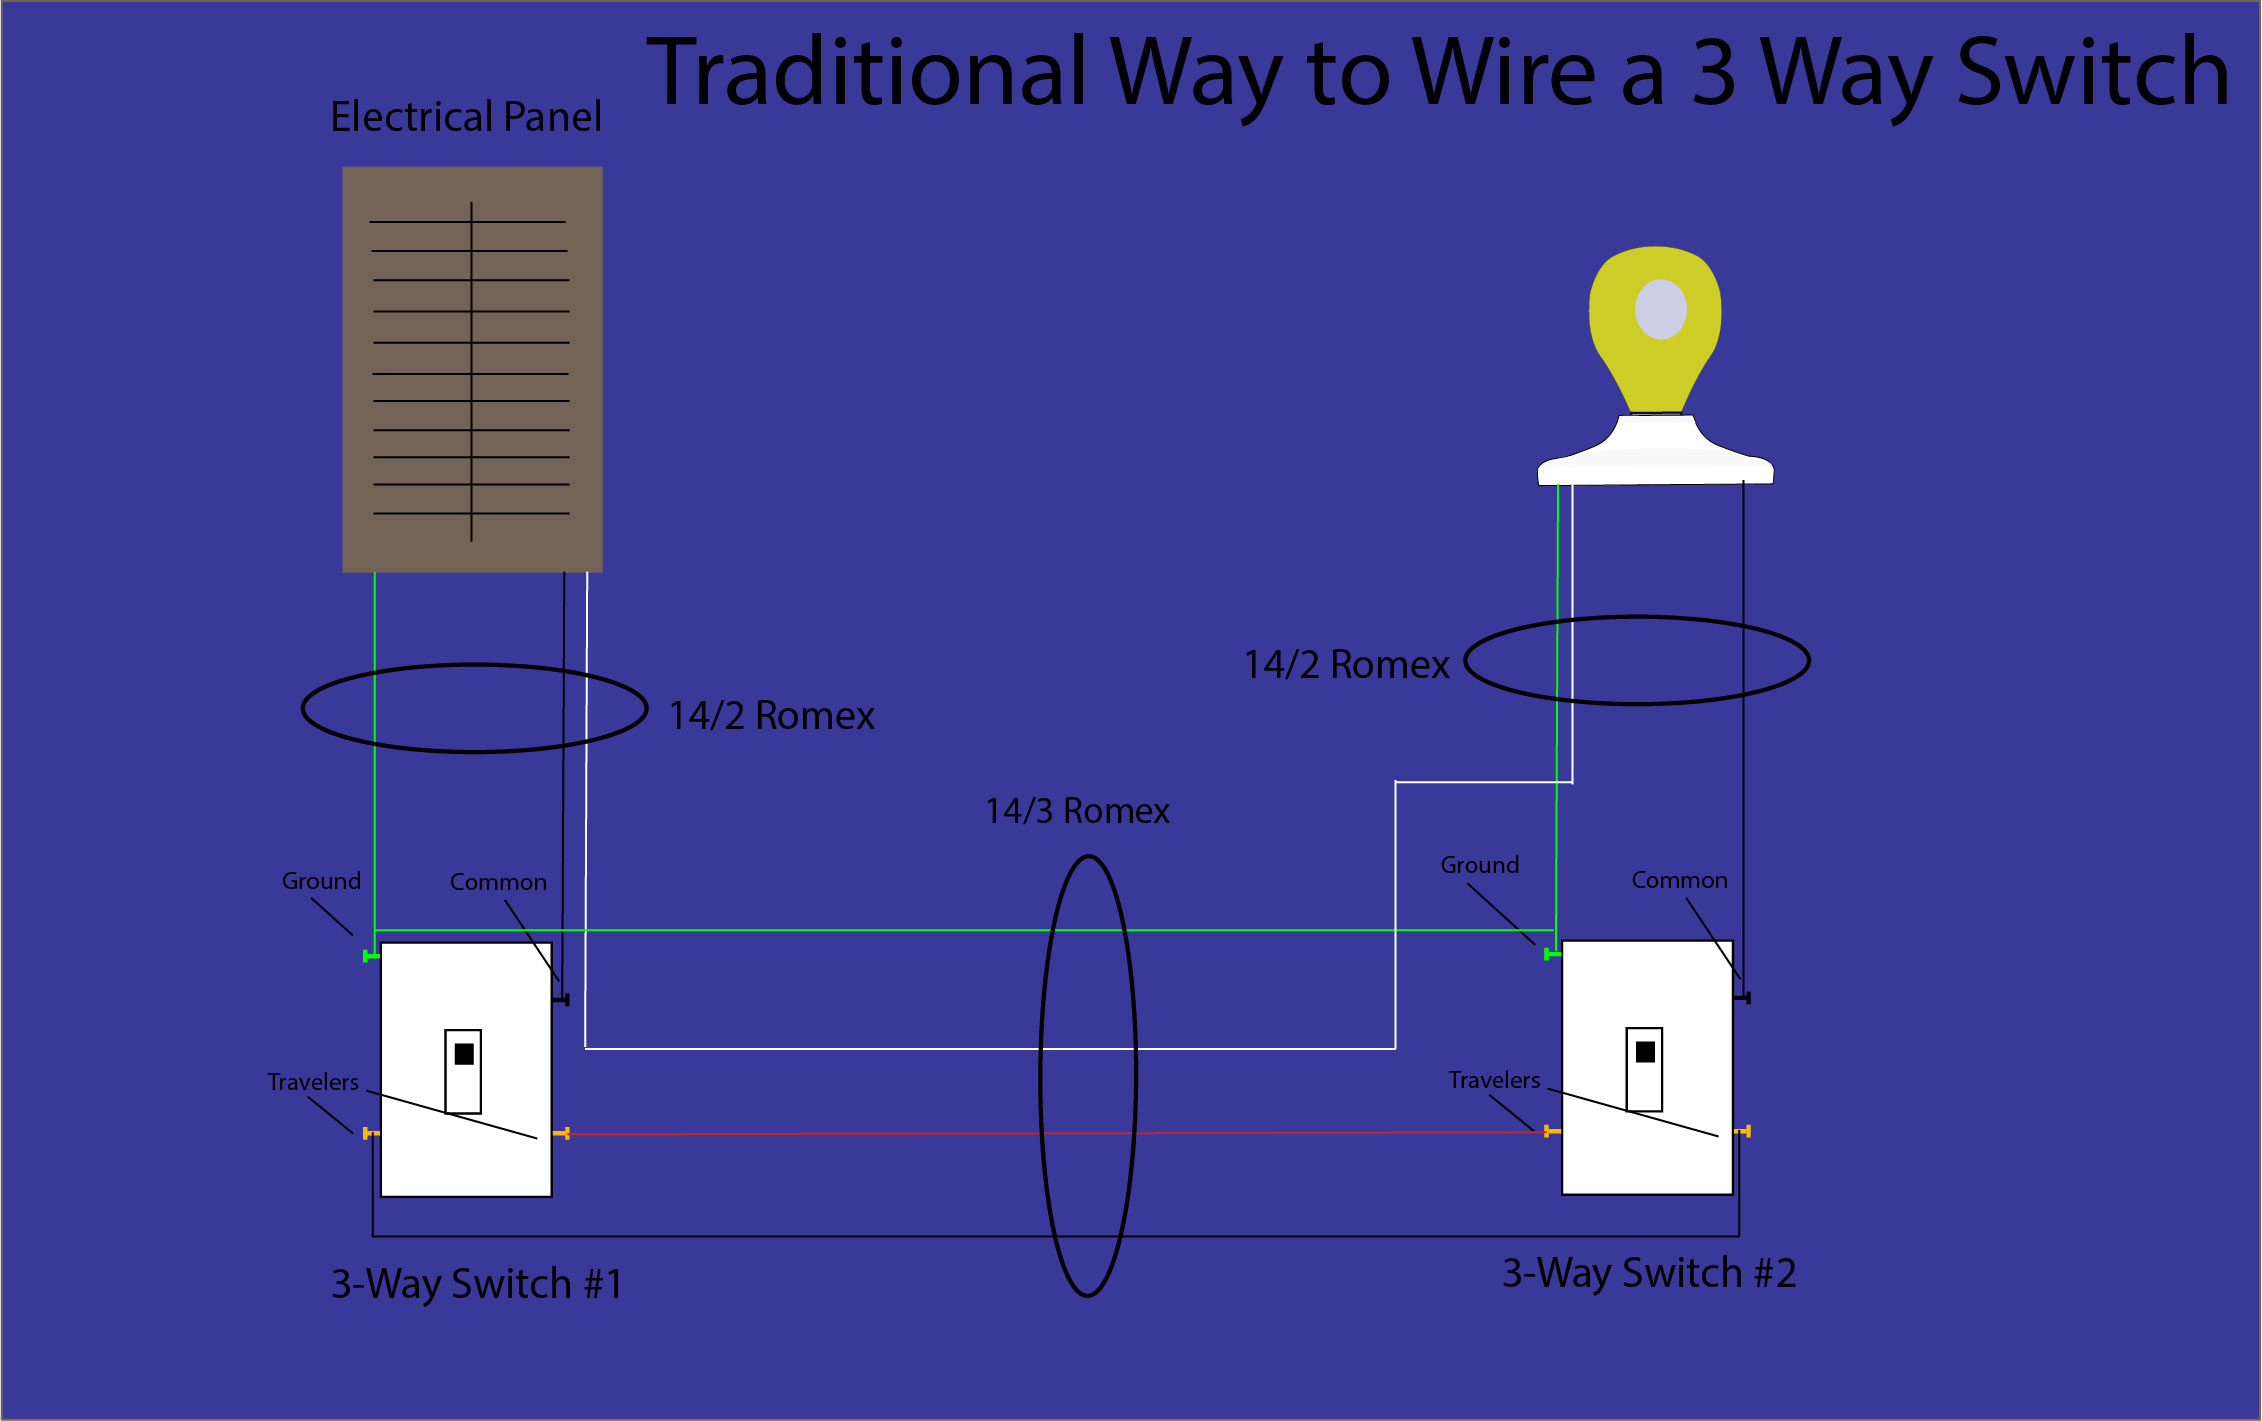
3 Way Switch Wiring Diagram
3 Way Switch #1
- 1Using a wire nut, connect the two white wires together
- 2Connect the black wire from the 14/2 feed wire to the black common screw.
- 3Attach the black, and red wires from the 14/3 to the two silver or gold screws that are opposite each other. The travelers. It doesn't matter which wire goes on which screw.
- 4Connect the two ground wires together, and then connect them to the ground screw. Use a green wire nut with a hole in it for this. It will allow one of the ground wires to pass through the wire nut, so you can hook it to the switch.
- 5Tuck wires neatly into the box, and install the switch. I like to run some electrical tape around the switch screws for some added protection.
3 Way Switch #2
- 1Using a wire nut, connect the two white wires together.
- 2Connect the black wire from the 14/2 wire going to the light, to the black common screw.
- 3Attach the black, and red wires from the 14/3 to the two silver or gold screws that are opposite each other. The travelers. It doesn't matter which wire goes on which screw.
- 4Connect the two ground wires together, and then connect them to the ground screw. Use a green wire nut with a hole in it for this. It will allow one of the ground wires to pass through the wire nut, so you can hook it to the switch.
- 5Tuck wires neatly into the box, and install the switch. I like to run some electrical tape around the switch screws for some added protection.
Once you have this done, you can wire your lights, which is as simple as white to white, black to black, and ground to ground.
Furthermore, make sure your feed wire either gets pulled into your electrical panel, or tied into another lighting circuit. Either way, it should be connected to no more than a 15 Amp breaker. Depending on where the lights are located, it may need to be a GFCI, and/or AFCI breaker. Again, this article isn't intended to go into all of the requirements for properly, and safely wiring a home. If you aren't sure how to do that, contact a professional, or try the smart switch way below.
How to wire a three way switch- The smart switch way
Why use a smart switch
One of the biggest advantages to using a smart switches is that you don't need to run a 14/3 wire between the switches. For this scenario, I recommend running the 14/2 feed wire, from either the electrical panel, or sub feed from another lighting circuit, and the 14/2 wire to the light into the same box. Please be sure to check the instructions that came with your smart switch for the load rating. It should tell you how many watts of incandescent light and LED/CFL, it is rated for.
I recommend using a smart switch, if any of the following reasons apply:
- 1No access to easily run wires.
- 2You want the ability to dim lights from both switch locations.
- 3If you aren't comfortable running wires, and don't want to pay an electrician to run them for you.
- 4You are trying to add a 3 way switch to an existing light
- 5The switches will be a long ways apart
- 6You want to be able to have the lights go on, and off automatically.
- 7You already have a home automation controller
- 8There is a need for more than two switches
The smart switch
A smart switch, is a switch that is able to communicate with another switch, or device. You can control it remotely, or use it to control something remotely. They usually have a lot of additional programmable features, like ramp up speed, and dim levels, and when combined with a home automation controller, can be used to create complex lighting scenes. Hence the word smart.
In our simple 3 way switch scenario, we don't have to worry about all of that. So we don't need a home automation controller, or any complex setup. We can simple set one switch to control the other.
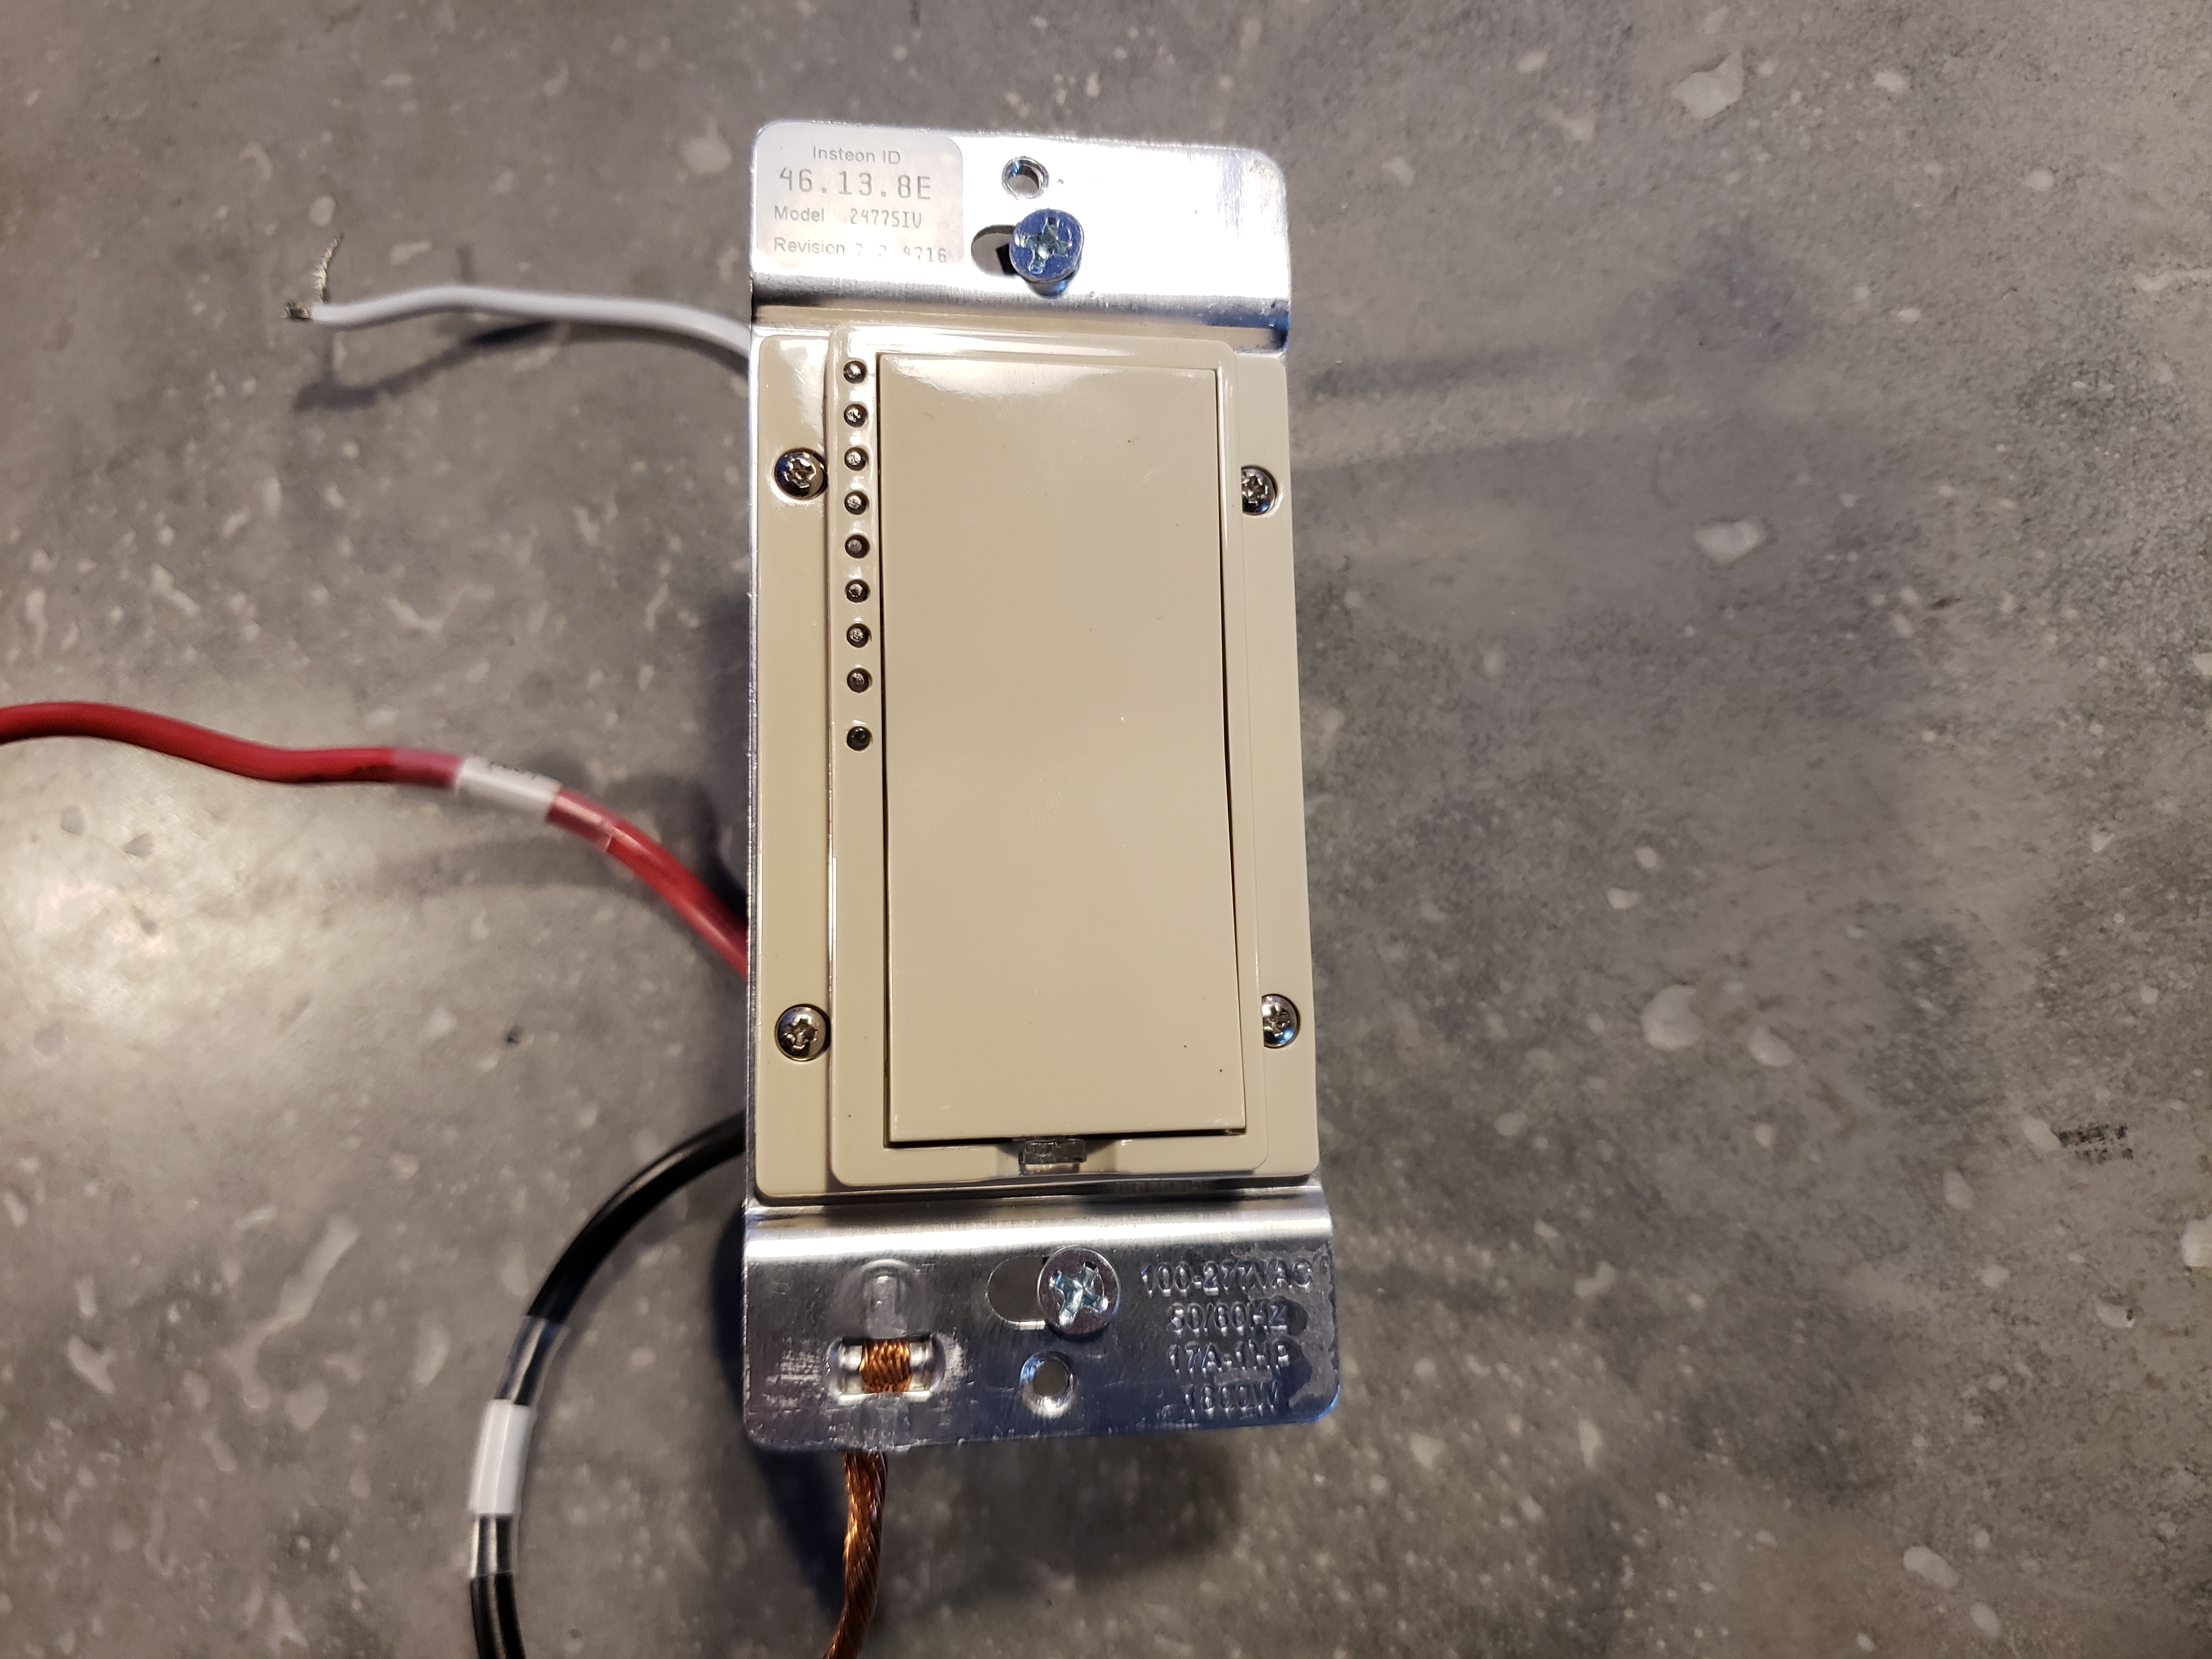
The Insteon Smart Switch
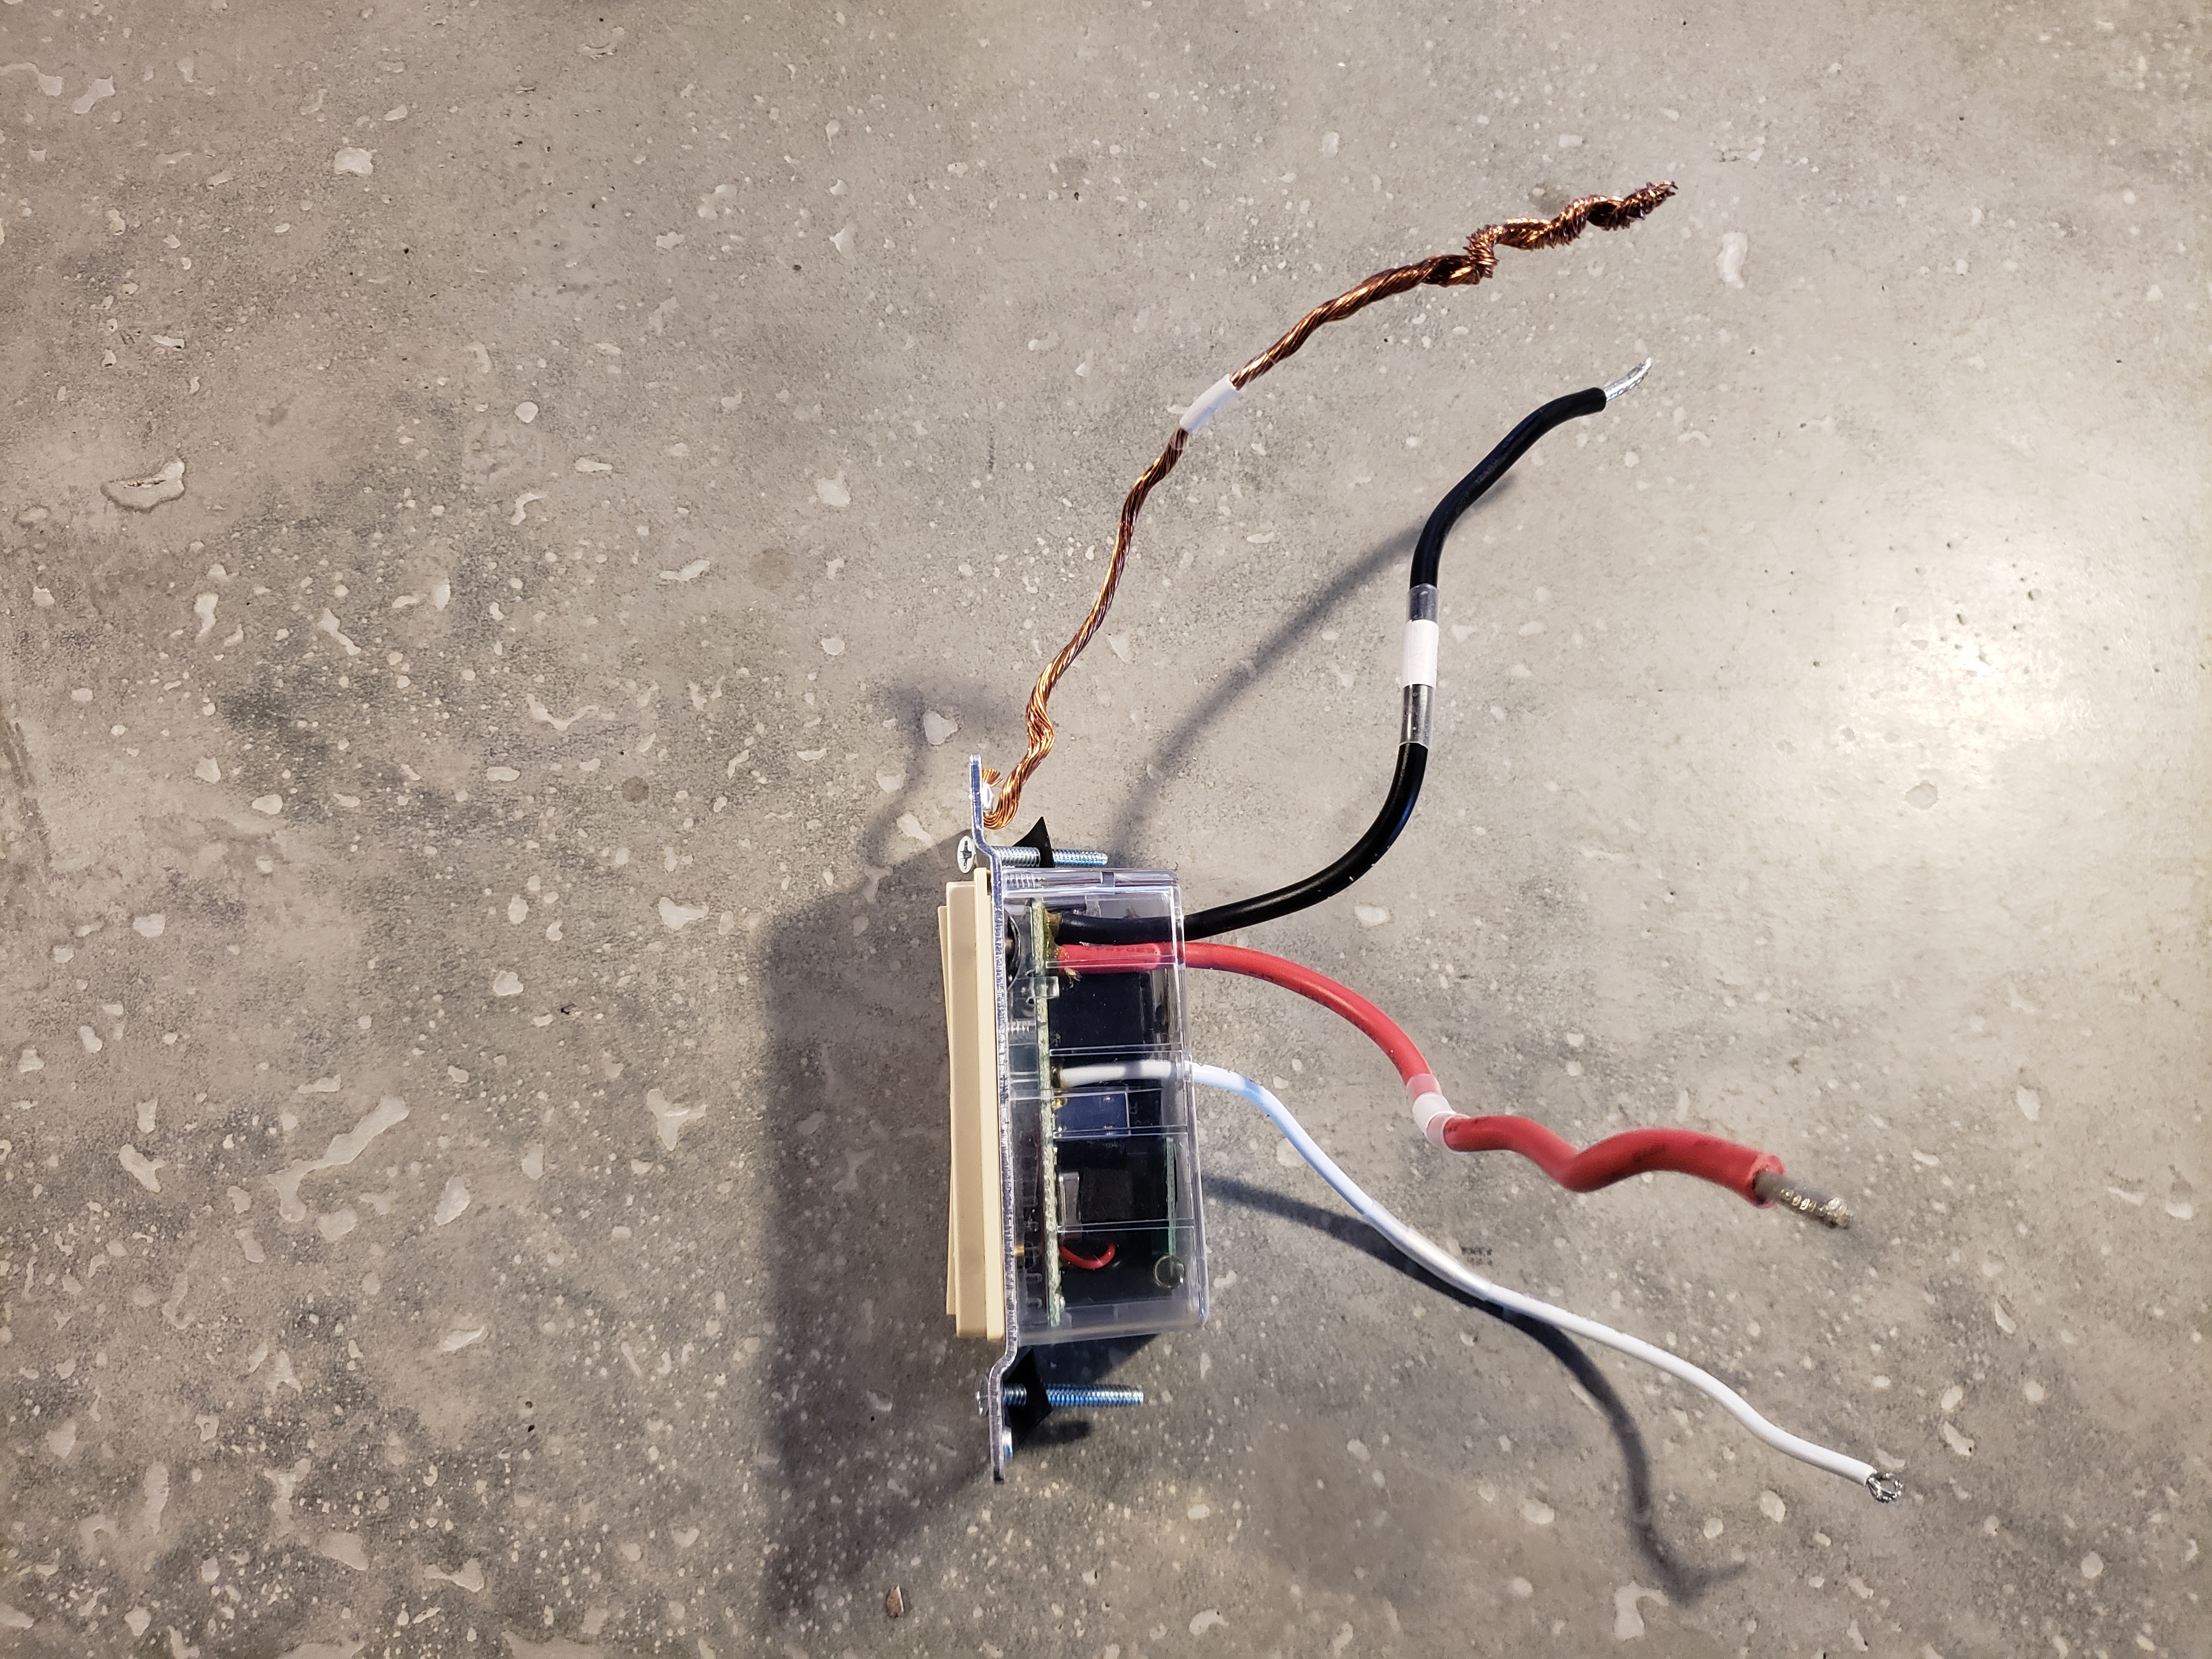
The Insteon Smart Switch
In our example, we are going to use two Insteon 2477 Smart Switches. I have found these to be reliable and simple to use. They come in many different colors and you can get them with as many as 8 buttons on them, so you can control many things from a single switch location. Therefore, the instructions from here on out pertain to Insteon switches only. Other smart switches would have different instructions.
You will notice that these smart switches don't have screws, they have wire pigtails. There is a white neutral wire, a black feed wire, a red load wire, and a bare ground wire. These same switches can be used for any lighting scenario, whether it is a single switch controlling a light, or many switches controlling the same light.
Pulling the wires for a smart switch- Open Walls
- 1First you need to get power from your electrical panel into one of the switch boxes using 14/2 wire. This can be either directly from the panel itself, or you can run a sub feed off from another lighting circuit somewhere in your house. You need to make sure you aren't mixing wire gauges, and that you aren't overloading a particular circuit. You also need to make sure are running pulling the wires through the wall properly to ensure they don't get damaged. This article doesn't get into the details on how to run the wires, and the dos and the don'ts. If you are not familiar with how to run the wires properly, I recommend that you contact a professional, or try the smart switch way below.
- 2Secondly, you need to get a 14/2 wire from the light, into the same switch box.
- 3Finally, you need to get power from your electrical panel into the other switch boxes using 14/2 wire. This can be either directly from the panel itself, or you can run a sub feed off from another lighting circuit somewhere in your house. This is going to be used to feed the other switch. The nice things about this, is that it doesn't need to be on the same circuit. You can get power from the nearest location. You need to make sure you aren't mixing wire gauges, and that you aren't overloading a particular circuit. You also need to make sure are running pulling the wires through the wall properly to ensure they don't get damaged. This article doesn't get into the details on how to run the wires, and the dos and the don'ts. If you are not familiar with how to run the wires properly, I recommend that you contact a professional, or try the smart switch way below.
Pulling the wires for a smart switch- Covered Walls
New- If you are adding a new switch, then you run the 14/2 from the light, and a 14/2 from the electrical panel, or from a sub feed, into the same box. Then you only need to run a 14/2 feed to the second switch location.
Existing/Replacement- If you want to add a 3 way switch to an existing light switch, then you don't need any additional wiring at that location. The only additional wiring you need, is to get a feed to wherever you want the second switch, using a 14/2 wire. You can use the old work (wing) boxes for putting an electrical box into a wall that is already covered with drywall.
If you already have a location for the second switch, and it has power, then you don't need to run any additional wires. Otherwise, you can get power from the nearest location. It will only be used to power the second switch, and there is no need to run a wire between the switch boxes.
Even if your second location already has a switch in it, you can get a multi button Insteon switch, and then use the primary switch for the light switch it is replacing, and one of the secondary buttons for your three way switch.
Here is a 6 button switch Insteon switch.
Wiring a 3 Way Smart Switch
Now you should have switch box #1 with a 14/2 feed wire, and a 14/2 load wire, and switch box #2 with a 14/2 feed wire.
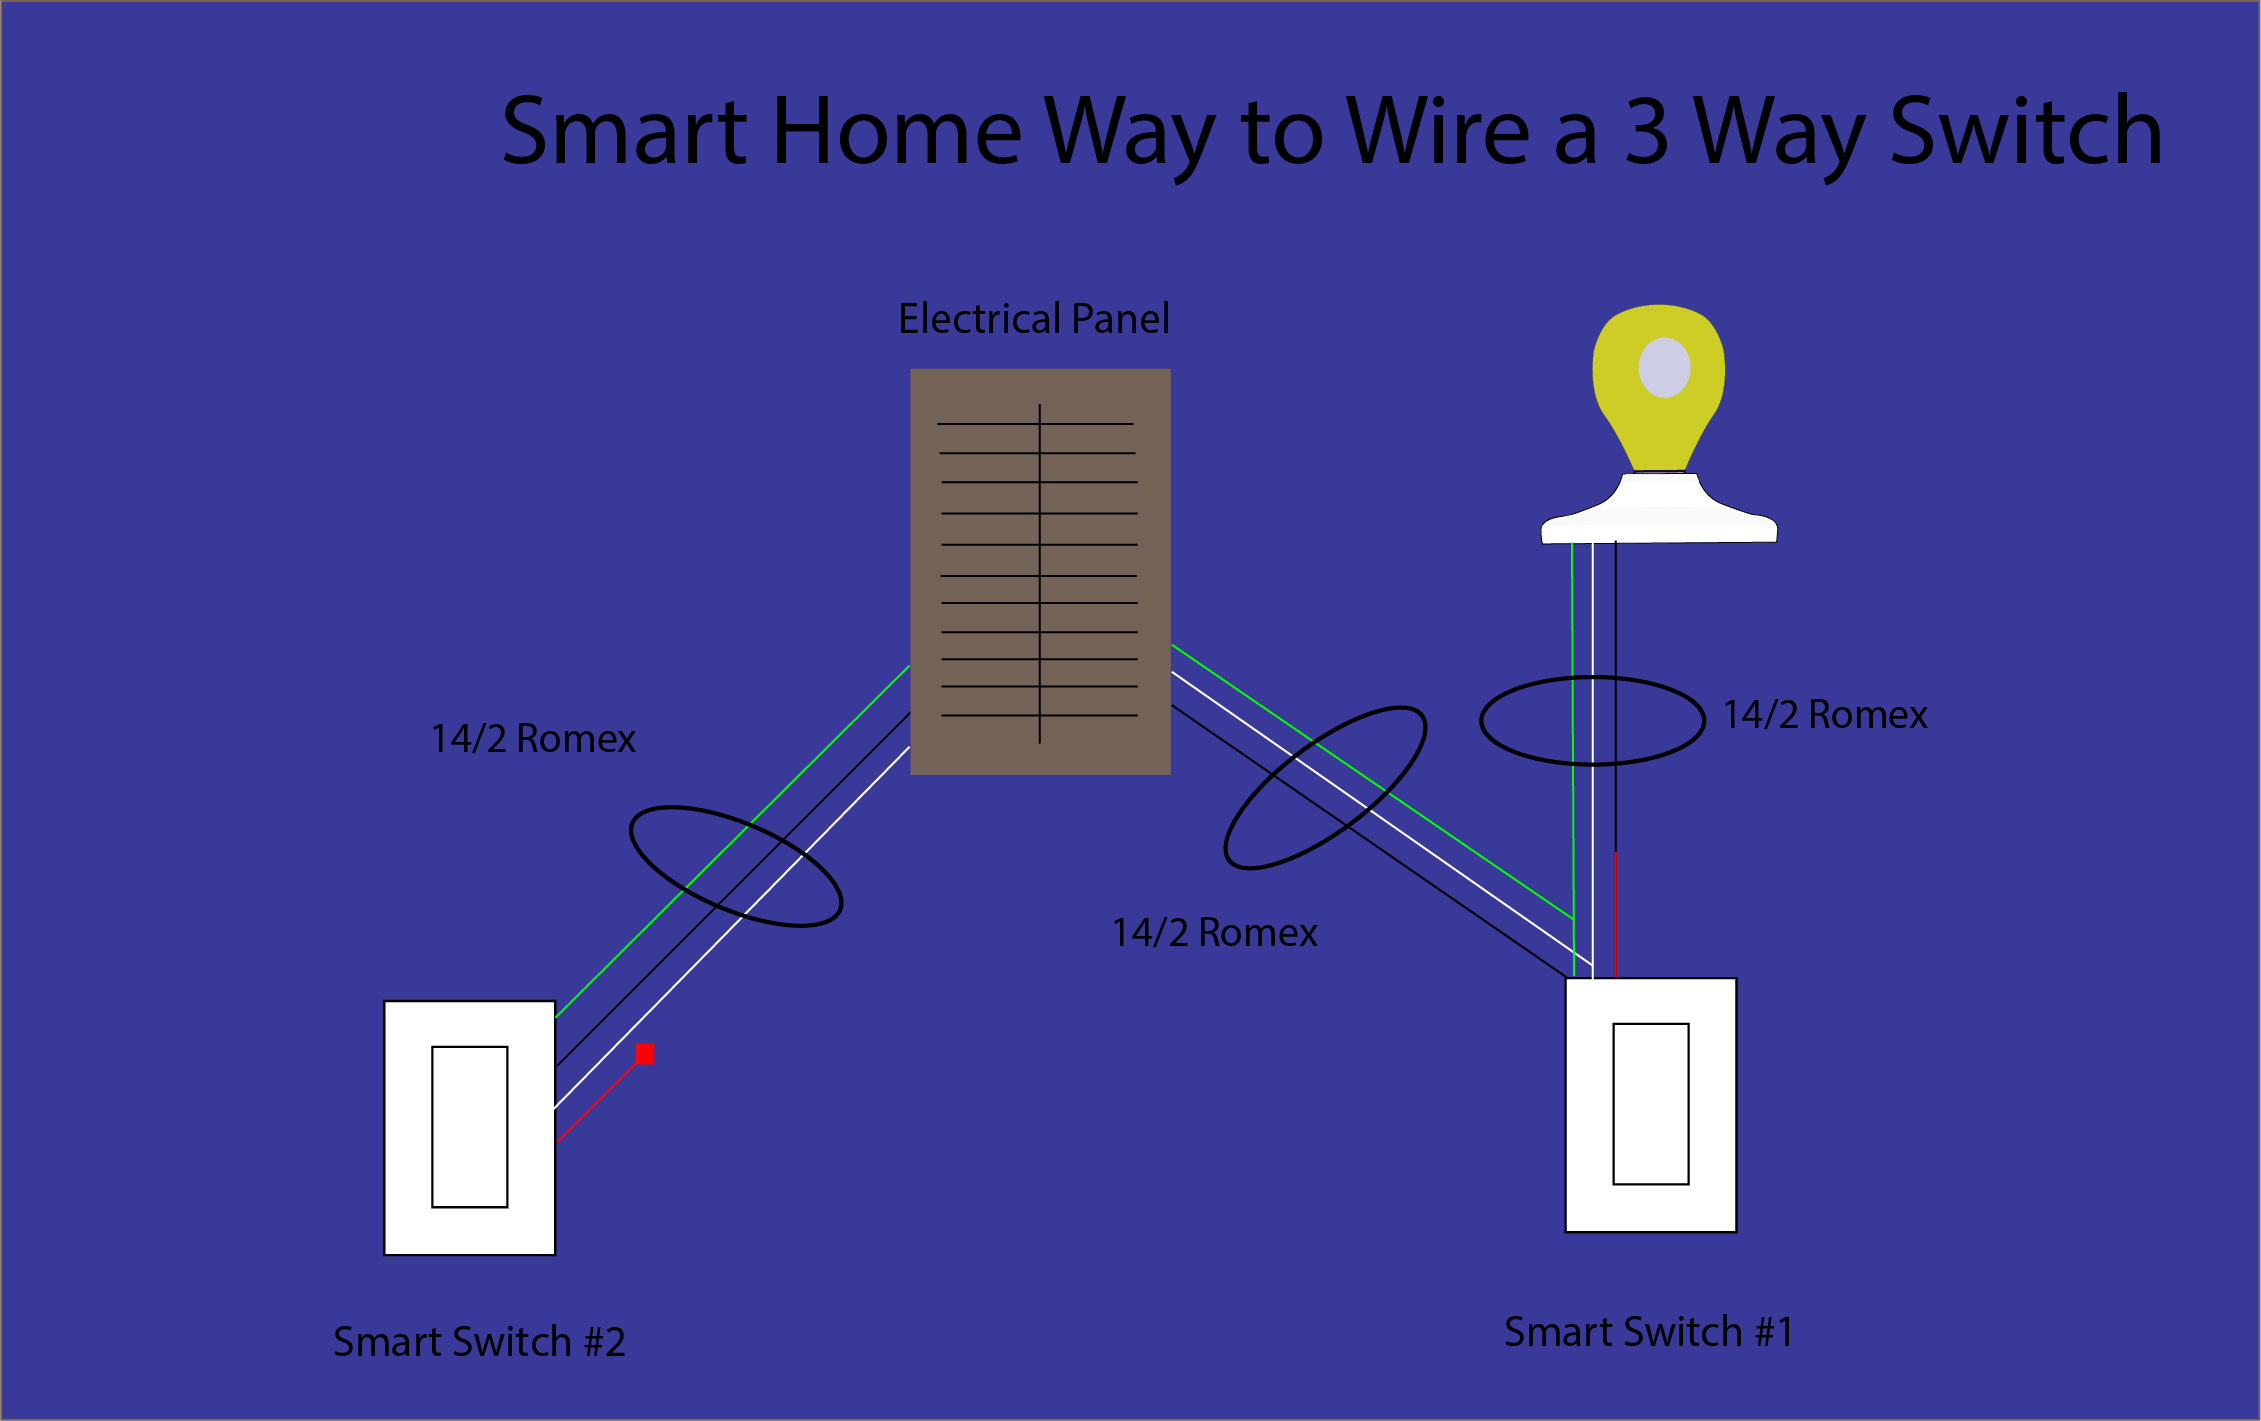
Insteon 2477 switch 3-way wiring diagram
Smart Switch #1
- 1Using a wire nut, connect the white wire from the 14/2 feed, the white wire from the 14/2 going to the light, and the white wire from the smart switch together.
- 2Attach the black wire from the 14/2 feed to the black wire on the switch, using a wire nut
- 3Connect all of the ground wires together using a wire nut.
- 4Attach the black wire from the 14/2 light to the red wire on the switch, using a wire nut.
- 5Tuck the wires neatly into the box, and install the switch
Smart Switch #2
- 1Connect the black wire from the 14/2 feed to the black wire on the switch, using a wire nut
- 2Attach the white wire from the 14/2 feed to the white wire on the switch, using a wire nut.
- 3Connect the ground wire from the 14/2 feed to the ground wire on the switch, using a wire nut.
- 4Put a wire nut on the red wire. It will not be used.
- 5Tuck the wires neatly into the box, and install the switch
Programming the Insteon smart switches
- 1Turn power on to both switches
- 2Make sure both switches are "On" by tapping the top of the switch paddle
- 3Press and hold the set button on Smart Switch #1 until it beeps. The LED should start flashing
- 4Now press and hold the set button on Smart Switch #2 until it beeps twice.
- 5Press and hold the set button on Smart Switch #2 until it beeps. The LED should start flashing.
- 6Finally, press and hold the set button on Smart Switch #1 until it beeps twice.
- 7The two switches should now be linked, and you should be able to turn the light on and off from either location, including dimming it from either location.
Conclusion
There are many ways to wire a three way switch, but unless your walls are open, and your not worried about dimming from multiple locations, or being able to control the lighting from other devices, then I think the best way to wire a 3 way switch, is to use smart switches. Granted, the smart switches are much more expensive, they are $35-$50 compared to $1-$2 for a traditional 3 way switch, but when you add in the time it would take to wire, or the cost to hire an electrician, plus all of the additional features you get with the smart switches, I think they are worth it. The savings from not hiring an electrician alone will more than pay for the cost of the switches.
Please see our supplemental YouTube video, that will show you how to wire these 3 way switches.
Thank you for reading this how-to. I hope you found it useful. Be sure to subscribe to our YouTube Channel, leave comments, and to give the video a thumbs up. There will be many more how-to articles, and videos coming from home automation, home theater, and renewable energy topics.
-Tim
* Please be safe! Follow all local and national building codes. Be aware that depending on where you live, you may need an inspection before you close up your walls. Never operate on live wires. Always shut the power off. It can damage the smart switches or KILL you. If you aren't comfortable working with electricity, contact a professional. You can always have them do the wiring, and you can hook up the smart switches yourself.

